
Store Furniture Safely by Cleaning and Wrapping
Dry each piece completely before covering it, use breathable padding and raise it off the floor. "Climate controlled" may mean temperature, humidity or both.
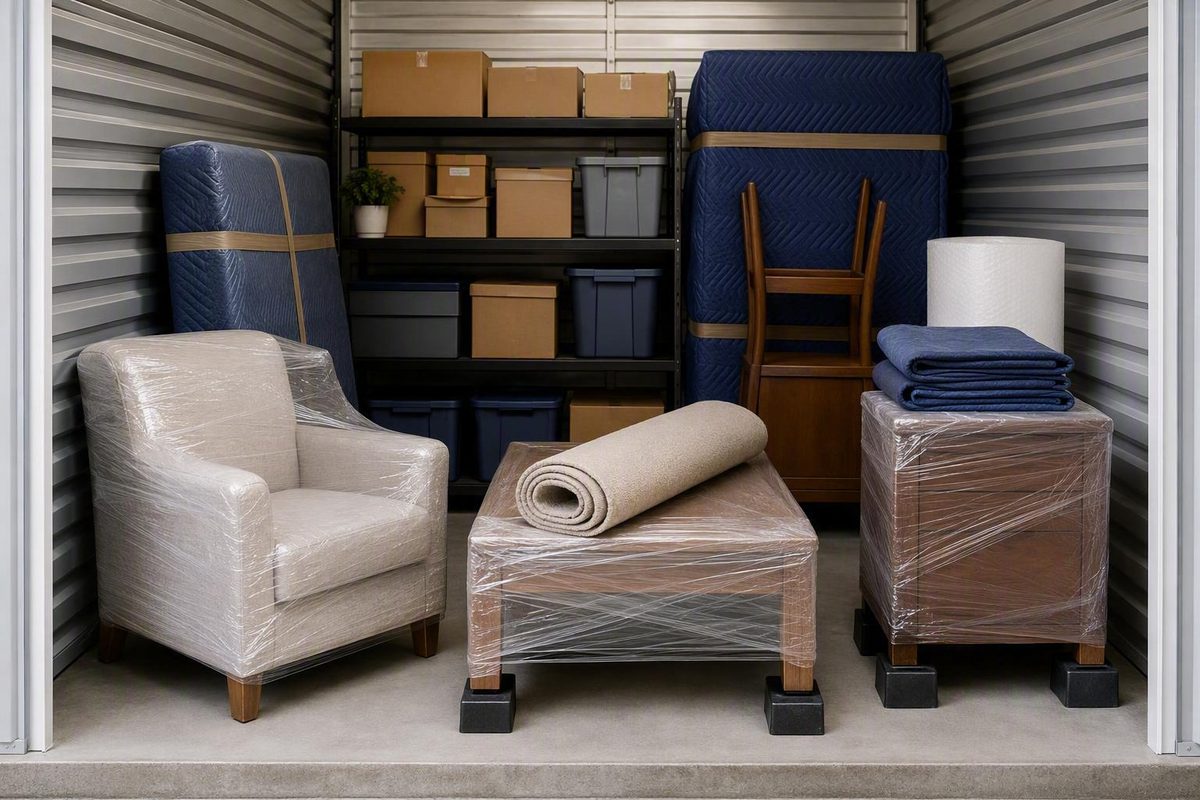
The best way to store furniture in a storage unit is to put it away clean and completely dry, disassemble what the maker allows, protect each surface with breathable padding, raise pieces off the floor, and arrange the unit without unstable stacks. Choose climate control when the furniture or local conditions make temperature and humidity swings a meaningful risk. No method makes storage damage-proof, so inspect the unit, read the lease, and confirm insurance before move-in.
Furniture storage checklist
Use this sequence so that protection starts before moving day:
- Inventory and photograph every piece. Record existing scratches, stains, loose joints, and missing hardware. Measure the furniture, doorways, vehicle opening, and storage-unit entrance.
- Check the facility and paperwork. Read prohibited-item rules, access hours, pest-control practices, climate-control terms, and any requirements for pallets, covers, or contents protection.
- Clean for the material, then dry fully. Dust and crumbs attract pests, while residual cleaning moisture can become a mold risk.
- Disassemble only as designed. Remove approved legs, shelves, leaves, bed rails, and cushions. Label parts and hardware.
- Pad before wrapping. Put moving blankets, furniture pads, clean cotton sheets, or another breathable cover against the piece. Keep tape and adhesive off finished surfaces and upholstery.
- Elevate and space the load. Use clean, stable, load-rated risers or pallets allowed by the facility. Leave an access aisle and small gaps for inspection and air movement.
- Load heavy, stable pieces first. Keep fragile and frequently needed items accessible. Do not place heavy boxes on upholstered seats, mattresses, glass, or furniture not designed to bear the load.
- Recheck after move-in. Look for dampness, condensation, pests, shifted coverings, or unstable stacks, especially after severe weather or a major seasonal change.
1. Choose the right unit before packing
Inspect the actual unit if possible. Look and smell for dampness, water staining, gaps around doors, pest evidence, and a dirty floor. Ask what “climate controlled” means at that facility: it may refer to temperature control, humidity management, or both. Also ask what happens during a power outage and whether the stated conditions are monitored.
Climate control deserves serious consideration when you are storing:
- antiques, heirlooms, veneers, inlays, or unknown finishes;
- leather, upholstered pieces, mattresses, or delicate natural fibers;
- furniture with glued joints or mixed materials that may react differently to changing conditions;
- items for many months or through hot, cold, or humid seasons; or
- anything expensive, difficult to replace, or already vulnerable to cracking, rust, odors, or moisture.
A standard drive-up unit may be reasonable for shorter storage of robust, fully dry pieces in a moderate climate, but it exposes contents to more outdoor temperature and humidity variation. Storage Star’s guide to non-climate-controlled furniture storage recommends extra attention to breathable covers, elevation, spacing, and periodic checks in that setting.
Climate control reduces environmental swings; it does not eliminate leaks, pests, handling damage, or every moisture problem. Inspect the building and unit rather than relying on the label alone.
2. Clean, document, and dry each piece
Photograph the furniture from several angles before cleaning and again before it enters the unit. Keep the images with an inventory that lists the material, dimensions, condition, replacement value, unit number, and hardware location.
Use the manufacturer’s care instructions or a cleaner intended for the specific finish or fabric. Avoid saturating wood, veneer, particleboard, upholstery, wicker, or joints. Vacuum upholstery, including below removable cushions. Remove all food residue and empty every drawer and compartment. For leather, antiques, unfamiliar finishes, or valuable textiles, ask the maker or a qualified conservator about cleaning and conditioning rather than trying a generic home treatment.
Allow every component to dry all the way through before covering it. The EPA’s mold and moisture guide says moisture control is central to mold prevention and advises drying wet or damp materials promptly. If a sofa, mattress, or porous composite still feels damp or smells musty, do not seal it up or move it into the unit; find and correct the moisture source first.
3. Disassemble and label without damaging finishes
Follow the assembly manual where available. Take reference photos before removing parts, and do not force glued joints or structural components that were not designed to separate.
- Put screws, brackets, washers, and specialty tools in labeled zip bags.
- Keep all hardware bags in one clearly marked parts box, with an inventory inside.
- Label matching components with removable tags tied around protected areas.
- Wrap table leaves, bed rails, and shelves individually so their edges cannot rub.
- Keep assembly instructions and photos in cloud storage as well as the parts box.
Some storage guides suggest taping hardware bags to furniture, but adhesive can mark a finish or release over time. A separate indexed parts box is safer when you cannot attach a bag without touching the surface.
4. Wrap furniture so it can breathe
The first layer against wood, fabric, or leather should generally be clean, soft, and breathable. Secure moving blankets or furniture pads with straps, twine, or stretch film applied around the padding, not directly against the furniture. Do not tighten wrap enough to dent cushioning, stress joints, or imprint a finish.
Extra Space Storage’s wood and upholstered furniture guide recommends breathable cloths, blankets, or sheets and warns that thick plastic directly around furniture can trap moisture. Rancho San Diego Self Storage gives similar breathable-cover and spacing guidance.
Plastic still has limited uses: it can hold a padded layer in place, protect a clean floor under risers if the facility permits it, or form part of a purpose-made mattress cover. It should not turn a damp or moisture-sensitive piece into an airtight parcel.
5. Protect different furniture materials
Wood, veneer, and composite furniture
Clean with a finish-compatible method and dry fully. Support long components so they do not bow, pad corners and carved details, and avoid placing concentrated weight on tabletops. Veneer, particleboard, and fiberboard can be particularly unforgiving of moisture and edge impacts, so climate control and careful elevation are prudent.
Upholstery and leather
Vacuum seams and both sides of removable cushions. Treat stains only with a product approved for the textile, then allow ample drying time. Use a breathable furniture cover and leave soft seating free of boxes or other loads. Climate control is the safer choice for leather, delicate textiles, long storage, or humid conditions.
Metal furniture
Clean and dry the piece, inspect chipped coating and existing corrosion, and follow the maker’s instructions for any protective treatment. Pad metal so it cannot scratch neighboring items. In an uncontrolled unit, watch for condensation and new rust during inspections.
Glass, mirrors, and stone
Remove panels only if the furniture was designed for it. Protect faces, corners, and edges with appropriate padding or a fitted picture/mirror carton. Mark the package as fragile, keep it out of traffic paths, and do not stack anything on it. Very heavy stone or glass may require professional movers and a support method specified by the maker.
Mattresses and cushions
Clean and fully dry them before using a purpose-made cover. Store them in the orientation recommended by the manufacturer, without heavy objects on top. Keep cushions off bare concrete and away from sharp edges.
6. Arrange the unit for elevation, airflow, and access
Start with a simple floor plan. Put clean, stable, load-rated risers or pallets down first, but do not create a wobbly platform or exceed the unit floor’s limits. Place the heaviest self-supporting pieces on their own feet or supports toward the back and sides. Keep weight distributed as the furniture was designed to carry it.
Leave a narrow center aisle and enough clearance to inspect behind larger pieces. Small gaps between furniture and walls make it easier to spot condensation, leaks, pests, and shifted covers. They are useful, but they cannot substitute for humidity control in a damp building.
Do not lean tall furniture where it can tip, block sprinklers or vents, or stack above the facility’s allowed height. Lock drawers and doors closed for transport; once safely positioned, follow the material and manufacturer guidance on whether leaving them slightly open is appropriate. Keep labels facing the aisle and items needed first near the door.
7. Reduce pest, rule, and insurance surprises
Never place food residue, plants, fuel, chemicals, or another prohibited item in the unit. Facility rules and local requirements vary, so use the lease—not a generic checklist—as the final authority. Remove crumbs, avoid used packing materials with pest evidence, and tell management promptly if you see droppings, gnawing, insects, water, or a damaged door seal.
Do not assume the facility automatically covers your furniture. The Insurance Information Institute’s self-storage coverage guidance notes that some homeowners or renters policies include limited off-premises coverage, while limits and exclusions vary. Ask your insurer what events, locations, and property types are covered; compare that answer with any facility protection plan. Keep your inventory, photos, receipts, lease, and policy documents somewhere outside the unit.
8. Check the furniture during storage
Visit on a schedule appropriate to the value of the pieces, storage duration, local climate, and facility conditions. After a storm, flood warning, prolonged humidity, or building outage, an earlier check may be worthwhile if access is safe and permitted.
During each visit:
- smell for mustiness and look for condensation or water marks;
- inspect floors, walls, covers, undersides, and the backs of furniture;
- check for insects, droppings, gnawing, or disturbed traps managed by the facility;
- confirm straps, padding, risers, and stacks have not shifted; and
- photograph the condition and report building problems in writing.
If furniture is wet, visibly moldy, badly rusted, or structurally unstable, avoid simply rewrapping it. Notify the facility, document the condition, contact the insurer when appropriate, and get material-specific professional help for valuable or porous items.
Common mistakes to avoid
- Storing furniture while it is still damp from cleaning.
- Wrapping wood, fabric, or leather directly in airtight plastic.
- Using a generic cleaner or conditioner on an unknown finish.
- Losing hardware or taping it directly to a visible surface.
- Putting furniture directly on a concrete floor.
- Crowding every gap so leaks and pests cannot be seen.
- Placing heavy boxes on cushions, mattresses, glass, or weak tabletops.
- Assuming “climate controlled” and “insured” mean complete protection.
- Skipping inspections for the entire rental period.
Careful preparation cannot guarantee damage-free storage, but it does make the biggest controllable risks easier to manage: moisture, dirt, pests, impact, pressure, lost parts, and poor access.